Supply and Demand Trading: How Zones Form, How to Grade Them and How to Trade the Return
Supply and demand trading marks the price areas where an imbalance of orders launched a strong move and trades the return to them, on the premise that unfilled orders remain. This guide covers how zones form (the four base patterns), how to draw them, the five tests that grade a zone's quality, the difference between a fresh zone and a used one, the confirmation to wait for on the return, and how supply and demand relates to order blocks, the modern name for the same idea.
Supply and demand trading rests on a claim about order flow: when price leaves an area fast, it does so because the orders on one side overwhelmed the other, and the overwhelming side rarely fills everything it wanted before price runs away. The unfilled remainder sits at the area it left, and when price returns there, those orders are still waiting. A demand zone is an area price rallied from with that kind of force; a supply zone is one it fell from. The method is older than the smart money vocabulary and describes the same thing an order block does, with a different emphasis: the zone, not the single candle. This guide covers how zones form, how to draw and grade them, the difference between a fresh zone and a used one, and how to trade the return without buying the first touch.
How zones form: the four base patterns
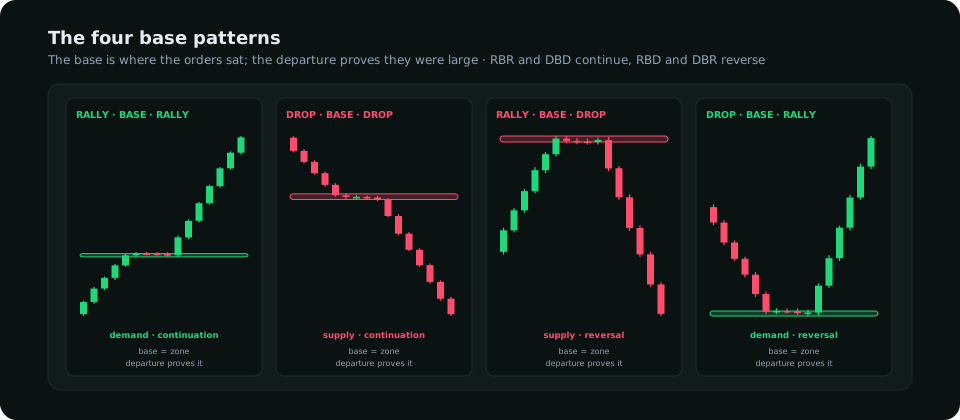
| Pattern | Shape | Zone type | Context |
|---|---|---|---|
| Rally · base · rally (RBR) | Up, pause, stronger up | Demand | Continuation in an uptrend |
| Drop · base · drop (DBD) | Down, pause, stronger down | Supply | Continuation in a downtrend |
| Rally · base · drop (RBD) | Up, pause, sharp down | Supply | Reversal at a top |
| Drop · base · rally (DBR) | Down, pause, sharp up | Demand | Reversal at a bottom |
The base is the pause: one to four candles of small range where the orders were placed. The departure is the move away, and it is the departure that proves the zone: a slow drift away means no imbalance and no zone; two or three wide-bodied candles closing at their extremes mean the orders were large. Reversal zones (RBD, DBR) tend to be stronger than continuation zones, because the orders that reverse a trend are larger than the ones that extend it.
Drawing the zone
For a demand zone, the lower edge is the lowest wick of the base and the upper edge is the highest body (open or close) of the base candles; for supply, the mirror. Drawing to the body rather than the top wick keeps the zone tight enough to give a sensible stop and still covers where the fills happened. A base that is one candle wide is the single-candle case the order block method describes; a base of three or four candles is a zone proper. On the daily chart a major-pair zone is typically 20–50 pips tall; on the four-hour, 10–25. If the drawn zone is taller than a day's ATR, it is two zones or none. The support and resistance guide uses the same wick-to-body rule for reaction zones.
Grading a zone: five tests
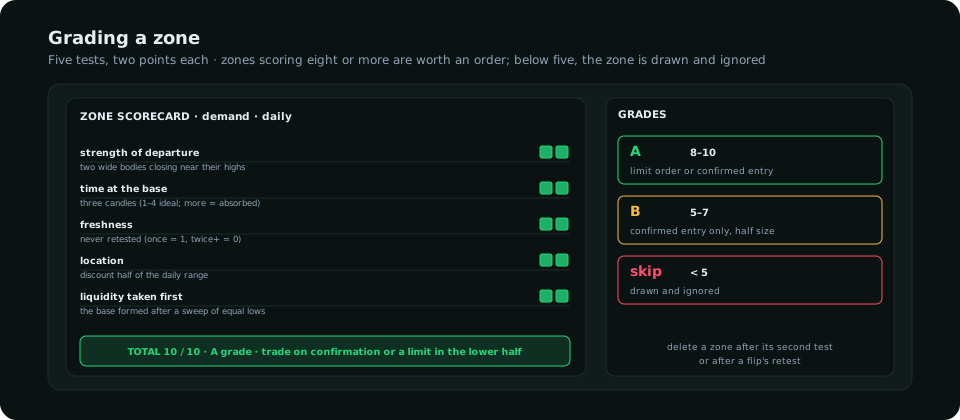
- Strength of departure. Two or more wide-bodied candles leaving the base, closing near their extremes, ideally leaving a fair value gap. The stronger the departure, the larger the unfilled remainder.
- Time at the base. One to four candles. A base of ten candles is a range in which the orders were gradually matched, not an imbalance.
- Freshness. A zone never returned to has all its orders left. Each return consumes some; after two tests, assume the zone is spent.
- Location. Demand in the discount half of the higher-timeframe range, supply in the premium half. A demand zone in premium is a zone against the odds.
- Liquidity taken before the base. A base that formed after a sweep of an obvious low (a drop-base-rally that first took out the prior lows) was built on stops, which is how large orders are filled. A base with no sweep before it is weaker.
Trading the return
Price returning to a graded zone is the setup, not the entry. The first touch of a fresh zone is the classic supply-and-demand entry and it has a real edge on A-grade zones; a limit order at the zone's near edge with the stop beyond the far edge takes it. The confirmed entry waits for price to enter the zone and show a rejection on the timeframe below (a wick into the zone and a close back out of it, or a small structure break), entering slightly worse but avoiding the zones that fail on contact. Two refinements from the smart money side improve both: expect price to sweep the minor low in front of the zone before reaching it, so the limit sits in the zone's lower half rather than at its top edge; and treat a daily close through the far edge as the zone failing, after which the retest from the other side is the trade, as the order block guide describes. Stop beyond the far edge plus a quarter of the zone's height; first target the nearest opposing zone or liquidity; the reward-to-risk to it should be at least 2 : 1 or the zone is too close to its neighbour to trade.
Fresh zones, tested zones and the "flip"
A fresh zone is the one to trade. A zone tested once still has orders, fewer; a zone tested twice is usually finished, and the third return is more likely to break it than to bounce. When a zone breaks with a displacement candle through its far edge, it flips: broken demand becomes supply, because the buyers who bought there are now trapped and will sell to get out on the retest. The flipped zone's first retest is one of the highest-probability entries the method offers, and it is the same event the liquidity grab guide calls a breakout confirmed by the retest. Keep a chart to three zones above and three below price, delete zones after their second test or after a flip's retest, and the chart stays readable.
Supply and demand versus order blocks
They are the same observation at two resolutions. An order block is the last opposing candle before the departure, which is the base at its tightest; a supply or demand zone is the whole base, which may be several candles. The order block method's refinements (the body rather than the wick, the lower-timeframe candle inside the block, the requirement that the departure broke structure) are all improvements a supply-and-demand trader can adopt without changing anything else, and the supply-and-demand method's grading (freshness, time at base, departure strength) is what order block traders are doing when they say "a valid block". Learn both vocabularies; trade one chart. The smart money concepts guide places both inside the wider method.
Frequently asked
What is a supply and demand zone?
The price area (the base) from which a strong move departed, drawn from the base's lowest wick to its highest body for demand and the mirror for supply. The departure's strength is what proves orders were left unfilled there.
How many times can a supply or demand zone be used?
Once at full confidence, twice at reduced confidence, and after that it is usually spent. A zone that breaks with displacement flips, and the retest from the other side is a new trade.
Is supply and demand trading the same as order block trading?
Essentially yes: the order block is the base at its tightest, and both trade the return to the origin of a displacement. The two methods' refinements are compatible and worth combining.
Everything on SMC Terminal is analysis and education, not a recommendation to buy or sell. Figures in the example are illustrative. Trading carries a substantial risk of loss. Manage your risk.