Fair Value Gaps (FVG): How to Identify and Test Trading Setups
Fair value gap trading rests on a three-candle pattern that marks where price moved faster than it could be matched. The gap fills more often than not, which is both why it works and why it is over-traded. This guide gives the identification rule, the three things that happen when price returns, the context that separates a gap worth trading from one that is merely a gap, and a procedure for testing an FVG setup on your own pair before risking money on it.
A fair value gap is the space left behind when price moves so fast that one side of the market never got filled. On a chart it is three candles: the wick of the first and the wick of the third do not overlap, and the middle candle's body spans the gap between them. Because unfilled orders sit in that space, price returns to it more often than not, and fair value gap trading is the practice of entering on that return. It is also, by some distance, the most over-traded concept in the smart money vocabulary, because gaps are everywhere and most of them mean nothing. This guide gives the rule for spotting one, the three things that happen when price comes back, the filters that make a gap worth trading, and a way to test the setup on your own market before trusting it.
The three-candle rule
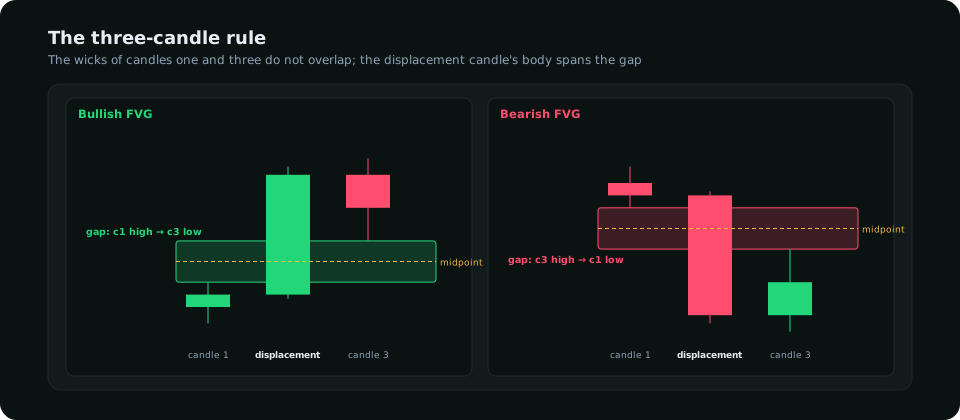
Bullish gap: candle three's low is above candle one's high. Bearish gap: candle three's high is below candle one's low. The gap's size is the distance between those two prices; its midpoint, sometimes called the consequent encroachment, is where the majority of fills stop. The middle candle must be a displacement candle: a wide body relative to recent candles, closing near its extreme. A gap left by an ordinary candle in a slow drift is a technicality, not a setup. The order block versus FVG article covers why the gap and the block that precedes it usually belong to the same move.
What happens when price returns
| Outcome | What it looks like | Read | Trade |
|---|---|---|---|
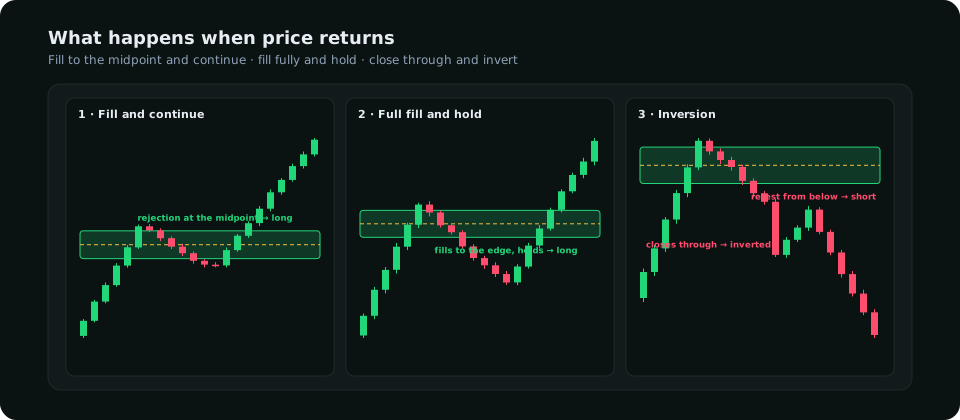
| Fill and continue | Price enters, reaches the midpoint, rejects | The unfilled orders were there; the move resumes | Entry at the midpoint, stop beyond the gap's far edge |
| Full fill and hold | Price trades to the far edge, closes inside | Weaker, still valid | Entry at the far edge, tighter stop beyond it |
| Inversion | A close beyond the far edge with a wide body | The gap failed; it now acts in the other direction | Retest from the other side, stop beyond the gap |
The inversion is underused. A bullish gap that price closes through is not just a failed long; it is a bearish zone, because the buyers who were supposed to be there were overwhelmed, and the retest of it from below is a short with a defined stop. Treating every gap as a two-way instrument (a long if it holds, a short if it inverts) roughly doubles the number of usable setups without adding a single new gap.
Filters: which gaps are worth trading
- Displacement. The middle candle's body is at least 1.5 times the average body of the previous ten candles. Without this, skip the gap.
- Structure. The move that created the gap also broke a swing high or low. A gap inside a range is filled and refilled all day; a gap that broke structure is part of a trend leg.
- Location. Bullish gaps in the discount half of the higher-timeframe range, bearish gaps in the premium half. The premium and discount article has the rule; a gap in the wrong half is a gap to let fill without you.
- Timeframe. Four-hour and daily gaps are the ones that hold; fifteen-minute gaps fill within hours and offer little. Mark gaps on the four-hour, enter on the fifteen-minute.
- Freshness. A gap that has already been filled to its midpoint once has had most of its orders taken. Trade the first return.
- The calendar. A gap left by a news candle is often filled by the next news candle; check for a release before entering on the return.
Entry, stop and target
Entry at the gap's midpoint with a limit, or on the fifteen-minute rejection candle for traders who want confirmation at the cost of a worse price. Stop beyond the far edge of the gap plus a buffer of a quarter of the gap's height. First target the swing high or low the gap's move created; second target the next liquidity beyond it. The reward-to-risk at the midpoint entry is usually 2 to 3 to the first target when the gap is a four-hour one; it is rarely above 1.5 on a fifteen-minute gap, which is the practical reason to ignore the small ones. The break of structure guide covers the structural target; the order block guide covers the case where a block sits directly beneath the gap and the two are traded as one zone.
Testing the setup before trusting it
Gaps are frequent enough that an honest test takes a few weeks of chart time, not months. Define the setup mechanically: timeframe, the displacement threshold, the structure requirement, the location rule, entry at the midpoint, stop beyond the far edge plus the buffer, target at the swing. Then, on one pair, scroll back six months of the four-hour chart and log every gap that passes the filters, including the ones that would have been skipped by instinct. Record the outcome in R. A hundred gaps is enough to see the shape: on most majors the filtered four-hour setup lands around a 45–55% win rate at 2 R average, which is a positive expectancy worth trading; the unfiltered fifteen-minute version lands near 50% at under 1 R, which is not. The backtesting guide sets out how to keep that count honest, and the win rate and expectancy article how to read the result.
Frequently asked
Do fair value gaps always fill?
Most do, eventually, which is exactly why the fact is not tradable on its own. The question is whether the gap fills and holds (a long), fills fully (a weaker long) or inverts (a short), and only the filters above shift those odds in your favour.
What timeframe is best for FVG trading?
Mark gaps on the four-hour and daily charts; use the fifteen-minute chart for the entry. Gaps below the one-hour fill too fast and too often to pay for the spread.
Fair value gap or imbalance, is there a difference?
No. Imbalance, inefficiency and fair value gap describe the same three-candle pattern. Liquidity void usually means a larger version spanning several candles; the rules are the same.
Everything on SMC Terminal is analysis and education, not a recommendation to buy or sell. Figures in the example are illustrative. Trading carries a substantial risk of loss. Manage your risk.