Premium vs Discount: The Equilibrium Rule That Stops You Buying the Top
Most losing trades in a trend are entries in the wrong half of the range. The dealing range, its equilibrium and the premium/discount rule are the simplest fix in Smart Money Concepts — here is the exact definition and how it filters a setup.
Go back through your last twenty losing trades in a trending market and sort them by one question: where in the range was the entry? Most traders find the same thing. The losses cluster in the half of the range nearest the recent extreme — buying after price has already run most of the way up, selling after it has already fallen most of the way down. The trade direction was often right. The location was wrong.
Smart Money Concepts has a precise fix for this, and it is the least glamorous idea in the whole method: the dealing range, its equilibrium, and the rule that you only buy in discount and only sell in premium.
Defining the dealing range
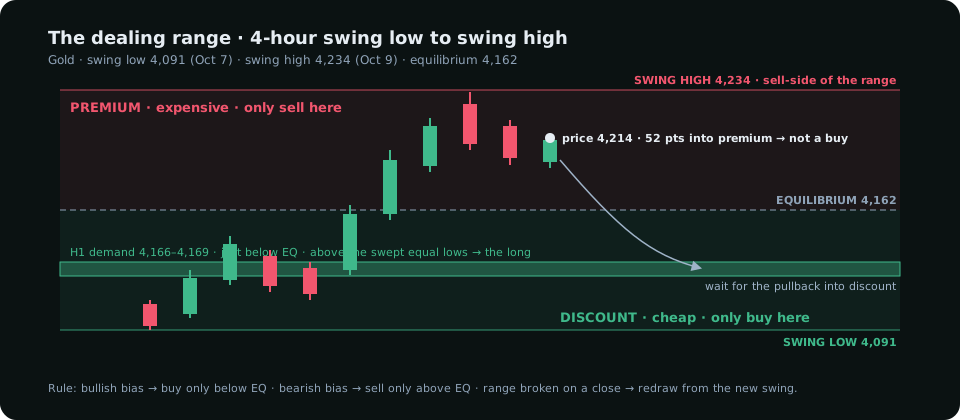
The dealing range is the distance between the most recent significant swing high and swing low on the timeframe you are planning from. "Significant" has to be a rule, not a feeling. The terminal uses swings confirmed by three bars on each side — a high that is higher than the three bars before it and the three after — on the 4-hour chart, and takes the last confirmed high and the last confirmed low. That is the range price is "dealing" in until one of them is broken on a close.
Equilibrium is the midpoint: (swing high + swing low) ÷ 2. Everything above it is premium — price is expensive relative to this range. Everything below is discount — price is cheap relative to this range.
Why the midpoint matters
The logic is about who is willing to transact where. In a bullish range the large buyer who moved price up from the low does not chase it at the high. He waits for price to come back toward the middle or below, where his average is good, and buys again. The sellers at the top are the late crowd. So a long taken in the premium half is a trade with the late crowd and against the participant who is actually driving the range. A long taken in the discount half is the reverse.
None of this requires believing anything mystical about institutions. It is the behaviour of any size trader with a target average price. The equilibrium rule simply puts you on the same side of the range as the patient money.
The rule, exactly
- Bullish bias: buy only when price is below equilibrium, from a demand zone or a liquidity pool in the discount half. A demand zone in the premium half is ignored, however clean it looks.
- Bearish bias: sell only when price is above equilibrium, from a supply zone or a pool in the premium half.
- At equilibrium (within a quarter of an ATR of it): no location edge. The trade is allowed but gets no extra weight from location.
- Range broken on a close: the dealing range is redrawn from the new swing and the old equilibrium stops mattering immediately.
Two refinements make this rule stronger than the basic version. First, use the range of the planning timeframe (4-hour) for the premium/discount split, not the execution timeframe (1-hour). An H1 range flips every day; the H4 range is what a day-trade is actually inside. Second, the best discount entries are not just below equilibrium — they are at a zone that sits under a liquidity pool in the discount half, so the pullback sweeps the pool, fills the zone and reverses from a level where both things happened at once.
A worked example
Take gold this week. The 4-hour swing low is 4,091 (the 7th), the swing high 4,234 (the 9th). Equilibrium is 4,162. Price at the time of writing is 4,214 — fifty-two points above the midpoint, deep in premium.
The higher-timeframe bias is bullish. The H1 chart shows a tested demand zone at 4,166–4,169 and fresh supplies above at 4,294 and 4,318. Apply the rule:
- A long here, at 4,214, is a long in premium — against the rule. However bullish the bias, the location is wrong.
- The demand at 4,166–4,169 sits just below equilibrium, in discount, and just above the equal lows that were swept on the 8th. That is the long. The rule says wait for it.
- A short at the equal highs at 4,218–4,223 is a short in premium — the location allows it, but the bias does not. It is a counter-trend trade; small, and only after the sweep and the structure shift.
Notice what the rule did. It did not change the bias. It told you that the obvious trade (buy now, it's bullish) is the wrong trade, and that the right one requires patience — a pullback of roughly fifty points that may or may not come. Most of the value of the equilibrium rule is in the trades it keeps you out of.
Where it fails
The rule assumes the range holds. In a strong impulse — a trend day, a breakout with a catalyst behind it — price does not come back to discount; it keeps making new ranges above. If you only buy discount you will miss those days entirely. That is the price of the rule, and it is worth paying: the trades you miss are the ones with the worst risk-to-reward, and the ones you take are the ones where the stop is close and the target is far.
It also fails when the swings are chosen badly. A range drawn between a minor H1 high and a major daily low is not a range; it is two levels from different stories. Pick both ends from the same timeframe, with the same confirmation rule, every time.
Where it lives on the terminal
On Market Trend, the H1 summary card reads "Location" as discount or premium against the 4-hour equilibrium, with the distance to it. The area of interest the plan chooses is already the nearest actionable zone in the bias direction — and because that selection runs from the H1 map rather than the 4-hour zone, it tends to land in the right half of the range on its own. When it does not, the Location line is the first thing to check before sizing the trade.
For the full method of choosing the area — and why the nearest zone beats the biggest one — see Order Block vs Fair Value Gap.
Everything on SMC Terminal is analysis and education, not a recommendation to buy or sell. Manage your risk.
More from the desk
All posts →