Smart Money Concepts (SMC): A Practical Forex Trading Guide
Smart Money Concepts is a way of reading price through the behaviour of large participants — where their orders sit, which stops they need, and how structure confirms they have acted. This is the whole method in one guide: structure, liquidity, zones, the entry model, and the rules that keep it honest.
Smart Money Concepts has a reputation problem. Half of what is published under the name is a vocabulary — order blocks, imbalances, inducements, breaker blocks — repeated until it sounds like knowledge. The other half is genuinely useful: a way of reading a chart through the needs of large participants, who cannot buy or sell size without the market providing the other side, and who therefore leave footprints wherever the other side was found.
This guide is the second half. Five ideas, in the order you use them, each with a rule precise enough to test. If a concept here cannot be written as a rule, we have left it out.
1. Structure: the market's direction, as a rule
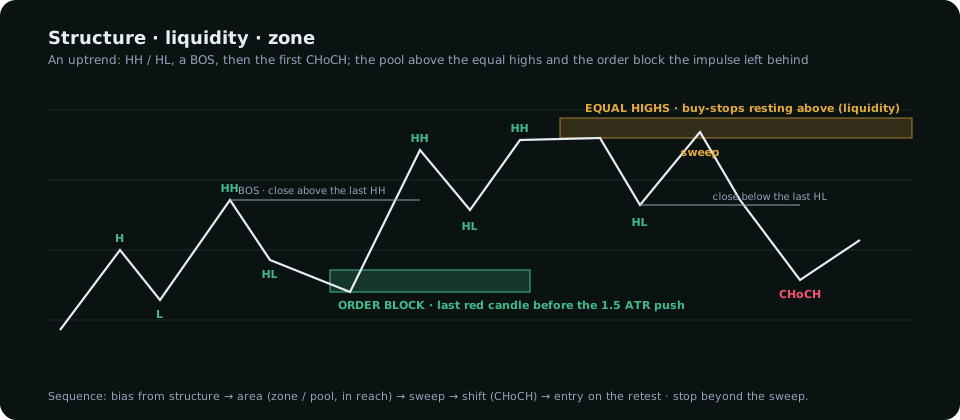
A swing high is a candle whose high is higher than the few candles either side of it; a swing low is the mirror. Label them in sequence and the trend labels itself: higher highs and higher lows is an uptrend, lower highs and lower lows a downtrend, anything else a range.
Two events matter. A break of structure (BOS) is a close beyond the last swing in the direction of the trend — the trend continuing. A change of character (CHoCH) is the first close beyond the last swing against the trend — the earliest evidence it is over. Everything else in SMC hangs off these two: you trade with the structure, you enter after a CHoCH on the lower timeframe, and you are wrong when structure breaks against you.
2. Liquidity: where the stops are
Large orders need counterparties. The cheapest counterparty is a cluster of stop orders, because stops execute at market and in the direction the large player wants to fill. So the first question a Smart Money trader asks is not "where is support" but "where are the stops?"
- Equal highs and lows: two or more swings at nearly the same price. Stops stack above the highs (from shorts) and below the lows (from longs). Rule: two swings within 0.2 ATR of each other form a pool.
- Obvious trendlines and round numbers: anything a textbook would draw is a place a crowd has placed stops.
- Session highs and lows: the Asia range is the standard target for London; the London high or low for New York.
A sweep is price trading through a pool and closing back on the original side. It is not a signal on its own; it is the precondition. The signal is what structure does after the sweep.
3. Zones: where the large orders were filled
When price moves impulsively from a level, orders were filled there and some are usually left. Two zone types describe the same event from two angles — the full comparison is in Order Block vs Fair Value Gap:
- Order block: the last opposing candle before an impulsive move. Rule used by the terminal: the move must be at least 1.5 ATR; the zone is the candle's open to its far wick; it is deleted the moment price closes through it.
- Fair value gap: the untraded space between candle one's high and candle three's low in a three-candle impulse. Price tends to return to fill at least half of it.
Zones are where to act, never why. A perfect order block against the higher-timeframe structure is a place to take profit, not to enter.
4. Premium and discount: the half of the range you are in
Take the last significant swing high and low on your planning timeframe; the midpoint is equilibrium. Above it price is in premium (expensive), below it in discount (cheap). The rule is blunt and it works: with a bullish bias, buy only in discount; with a bearish bias, sell only in premium. It keeps you off the late entries that account for most losing trades in a trend. The worked example on gold is in Premium vs Discount.
5. The entry model
Put the four ideas together and the entry is a sequence, not a pattern:
- Bias from the higher timeframe's structure (daily and 4-hour). Long in an uptrend, short in a downtrend, nothing in a range.
- Area: the nearest zone or liquidity pool in the bias direction, in the right half of the range, within reach — the terminal's rule is within 4 hourly ATR of price.
- Sweep: price takes the liquidity at or just beyond the area.
- Shift: an H1 (or M15) change of character back in the bias direction — a close beyond the last opposing swing. This is the trigger. The touch of the zone is not.
- Entry on the retest of the zone or the gap the shift left; stop beyond the sweep; targets at the next liquidity pool, then the opposing zone.
Steps 3 and 4 are what separate SMC from "buy support, sell resistance". The sweep shows the stops were taken; the shift shows someone used them. Without both, you are guessing that a level will hold.
The rules that keep it honest
- Timing. Sweeps outside the London and New York windows are far more often drift than raid. The terminal requires the trigger to print inside a killzone; so should you.
- Positioning. A sweep reverses when the squeezed side is crowded. Check the weekly CFTC report before trusting a reversal — our three-part check shows how.
- Invalidation beyond the area, never between price and it. A short from supply is wrong when price closes above the supply — not at some swing below it.
- Delete what has been traded through. A zone price closed through has no orders left. Keeping it "in case" is how the same level costs you twice.
- Size from the stop, not the conviction. See risk management. Conviction is the feeling that precedes the largest losses.
What SMC is not
It is not a secret about how banks trade. Nobody at a bank marks order blocks. It is a model of the consequences of size needing liquidity, and like every model it is useful where its assumptions hold — liquid markets, active sessions, structure that is actually there — and useless where they don't. Treat it as a way to read, test every rule on your own charts, and discard the vocabulary that doesn't earn its place.
Everything on SMC Terminal is analysis and education, not a recommendation to buy or sell. Manage your risk.