Inducement in Trading: How Smart Money Baits Early Entries, and How to Trade After It
Inducement in trading is the small, obvious level that sits in front of the real one: a minor pullback low just above the order block, a tidy trend line, a first touch of a zone. Early entries go there, their stops go just beyond it, and the move that takes those stops is what fills the real entry. This guide explains the mechanics, the three places inducement forms, how to tell the bait from the level, and a rule set for entering after the inducement is taken rather than at it.
Inducement is the smart money term for a level that exists to be traded by the wrong people first. Price pulls back, forms a small, obvious low, and bounces; early entries buy that bounce and put their stops just below the small low. The real demand, the order block or zone that the whole move will launch from, sits a little further down. Price then returns, takes the small low and the stops below it, enters the real zone, and reverses. The small low was the inducement: the bait that drew in entries and positioned their stops exactly where the larger participant needed liquidity to fill. This guide explains the mechanism, the three places inducement reliably forms, how to tell the bait from the level, and a rule set for entering after the inducement is taken rather than at it, which is the whole difference between being the liquidity and using it.
The mechanism
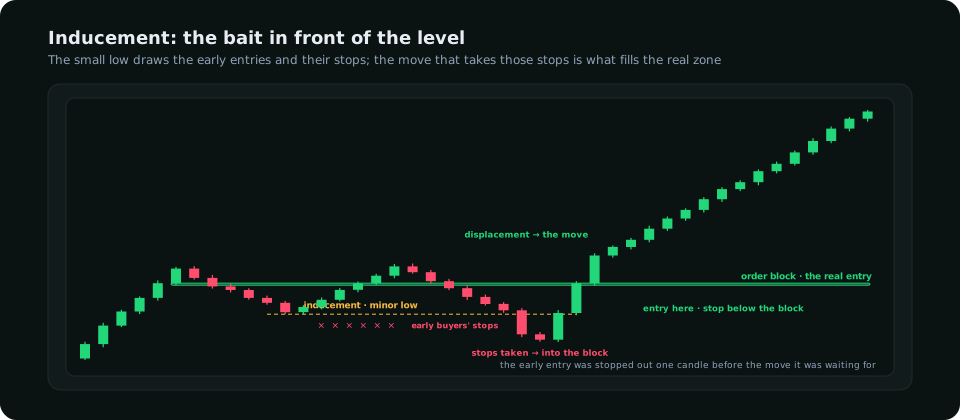
Nothing about this requires a conspiracy. A participant who needs to buy a large amount cannot do it at the bounce from the small low, because the sellers there are few; it needs the sell orders that sit below, which are the stops of the early buyers and the breakout sells of traders who think the low breaking means lower prices. Pushing price through the small low turns both into sell orders at once, and the large buyer fills against them in the zone where it wanted to buy anyway. The early entrant's analysis was often correct about direction and wrong by one candle about location, and in trading that is the same as wrong. The liquidity sweep guide describes the general case; inducement is the specific case where the swept level was created by the pullback itself.
Three places inducement forms
| Where | What the bait looks like | Where the real level is |
|---|---|---|
| The first pullback after displacement | A minor higher low above the order block, with a bounce that looks like the continuation starting | The order block itself, 10–30 pips lower on an hourly chart |
| A trend line or channel touch | The third or fourth touch of a tidy line everyone has drawn | The zone just beyond the line; the line's break is the sweep |
| The edge of a zone | A wick that tags the top of a demand zone and bounces, drawing entries at the first touch | The lower half or the body of the zone, where the orders actually sit |
The first is the most common and the most expensive. After a displacement leg, traders who know to buy pullbacks buy the first dip; the first dip stops short of the order block because it is the early buyers themselves who stop it, and their presence creates the stops that fund the move into the block. The order block guide describes the same event from the block's side: the "refined" zone is where the fill happens, and the pullback that stops short of it is the inducement.
Telling the bait from the level
- What made it. A real level is the origin of a displacement (an order block) or a wick-to-body rejection zone with a reason to exist. An inducement is a minor swing created by a pullback, with no displacement from it.
- Where it sits. Inducement sits in front of a real level, between price and the zone. If the only level in the direction of the pullback is the one you are looking at, it is probably the real one; if there is an obvious zone beneath it, it probably is not.
- How obvious it is. The tidier the line and the more textbook the bounce, the more entries it has drawn and the more stops sit beyond it. Obviousness is the point of the bait.
- The liquidity beyond it. A level with a cluster of stops just past it is a target; a level with nothing beyond it is a level. Ask what price would gain by trading through.
The sequence, and where to enter
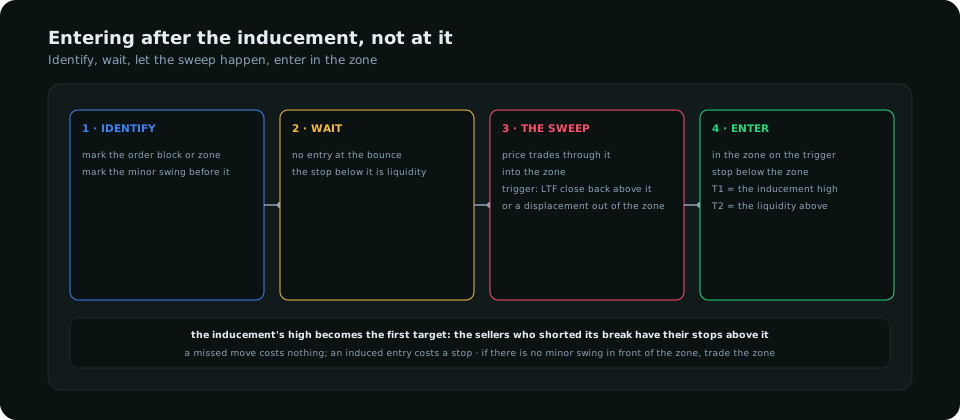
- Identify both levels. On the entry timeframe, mark the real zone (the order block or wick-to-body zone with a reason) and the inducement swing in front of it.
- Do not enter at the inducement. The bounce from it is the trade that gets stopped. If the move continues without ever returning, the trade was missed, and a missed trade costs nothing.
- Wait for the sweep into the zone. Price trades through the inducement, taking the stops, and reaches the zone. The trigger is a lower-timeframe close back above the inducement level, or a displacement candle out of the zone.
- Enter in the zone, stop beyond it. First target the high of the inducement bounce, because the sellers who shorted the inducement break have their stops above it; second target the next liquidity beyond.
The entry taken this way is deeper (better price), its stop is structural (beyond the zone, not beyond a minor swing), and its first target is defined by the trapped traders' stops. The optimal trade entry guide shows that the zone usually sits in the 62–79% band of the displacement leg, which is one more way to find it; the inducement is typically the swing between 38% and 50%.
When there is no inducement
Not every pullback has bait. A fast pullback straight into the zone with no intermediate swing means there was no inducement to take, and the zone itself is the entry on its confirmation. The sequence above is a filter for the common case, not a requirement; the trader who waits for an inducement sweep that was never going to happen misses clean entries. The rule is: if there is an obvious minor swing between price and the zone, assume it will be taken first; if there is not, trade the zone.
Inducement on higher timeframes
The same structure appears on daily charts over weeks. A daily pullback forms a minor low above the weekly demand zone, bounces for several days, draws in swing longs, and then takes the low and enters the weekly zone before the real move. The supply and demand guide's rule that the first touch of a zone is weaker than the sweep into it is the same observation at the weekly scale. Positioning data adds a dimension here: when the COT report shows speculators adding at the inducement bounce, the stops that will be taken are visible in the data a week before they are taken on the chart.
Frequently asked
What is inducement in trading?
A minor, obvious level placed between price and a real zone, where early entries and their stops cluster. The move that takes those stops fills the real zone, and the entry after that move is the one with the structural stop and the better price.
How do I avoid being induced?
Mark the real zone first. If there is an obvious minor swing between price and the zone, assume it is bait and wait for price to trade through it into the zone before entering. A missed move costs nothing; an induced entry costs a stop.
Is inducement the same as a liquidity sweep?
Inducement is the level that gets swept; the sweep is the event. Inducement specifically refers to a level created by the pullback itself, in front of the real zone, rather than a pre-existing high or low.
Everything on SMC Terminal is analysis and education, not a recommendation to buy or sell. Figures in the example are illustrative. Trading carries a substantial risk of loss. Manage your risk.