Order Blocks in Forex: Identification, Confirmation and Failure
Order block trading works when the block is the real origin of an institutional move and fails when it is just the last candle before any move. This guide sets out the identification rules that separate the two, the confirmation sequence to wait for on the return, and what a failed order block looks like, so that the failure itself becomes a trade.
Order block trading rests on one observation: when a large participant executes a position, the market leaves a footprint, usually the last candle in the opposite direction before price moves impulsively away. That candle's range is where the order was filled, and when price returns to it, the unfilled remainder of the order is often still there. The problem is that every move has a last opposing candle, and most of them are nothing. This guide gives the rules that distinguish a real order block from a coincidence, the confirmation to wait for when price returns, and the shape of a failure, because a failed order block is one of the cleanest signals that the market has changed hands.
Identification: five conditions
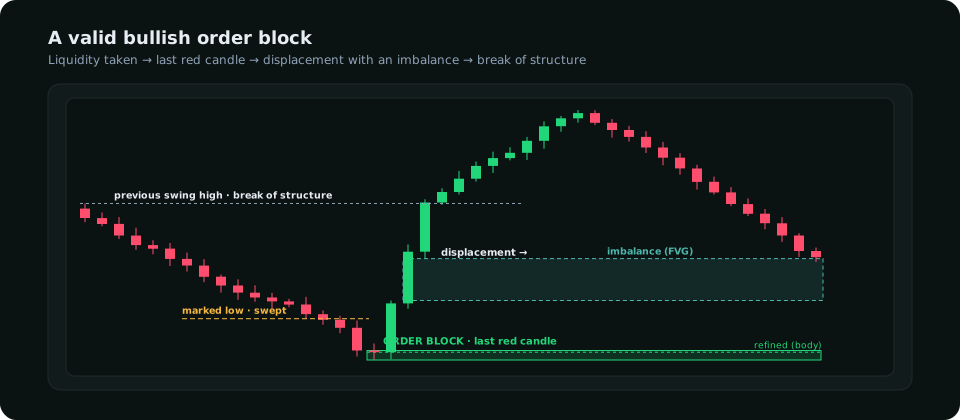
| Condition | What to look for | Why it matters |
|---|---|---|
| 1. Last opposing candle | For a bullish block, the final red candle (or group) before the move up | That is where the buying was absorbed; the zone is its range |
| 2. Displacement | The move away is impulsive: large bodies, small wicks, two to four candles | A slow drift away means no urgency, which means no large order |
| 3. Imbalance | A fair value gap inside the displacement | Proof that price moved faster than it could be matched; the hallmark of institutional execution |
| 4. Structure break | The displacement closes beyond the previous swing high or low | Converts the move from a reaction into a change of order flow |
| 5. Liquidity taken first | The block formed after a sweep of equal lows, a session low or an obvious stop cluster | Large orders are filled against stops; a block with no sweep before it is weaker |
Blocks that meet all five are rare, perhaps one or two per pair per week on the four-hour chart, and that is the point. Blocks that meet two or three are the ones that fill your journal with losses. The break of structure guide covers condition four and the sweep guide condition five; the order block versus fair value gap article explains why condition three is the one most traders skip.
Refining the zone
The whole candle range is the coarse zone; the refined zone is tighter and gives a better stop. Two refinements are standard. Use the body of the candle (open to close) rather than the full range when the wick is long, since the wick was the sweep, not the fill. And drop to a lower timeframe inside the block to find the specific small candle that preceded the first displacement candle; that is usually where the order sat. A four-hour block refined to a fifteen-minute candle can cut the stop distance in half, which doubles the reward-to-risk on the same target. The trade-off is a higher chance of being missed by a few pips; accept that in exchange for the asymmetry.
Context: premium, discount and the higher timeframe
A perfect bullish block in the premium half of the daily range, against a daily downtrend, is a counter-trend scalp at best. The blocks worth waiting for sit in discount for longs and premium for shorts, in the direction of the higher-timeframe structure, and ideally where the positioning and macro reads agree. Order blocks are an entry technique; they do not supply the bias. Taking every valid block regardless of context is how a sound concept earns a bad reputation.
Confirmation on the return
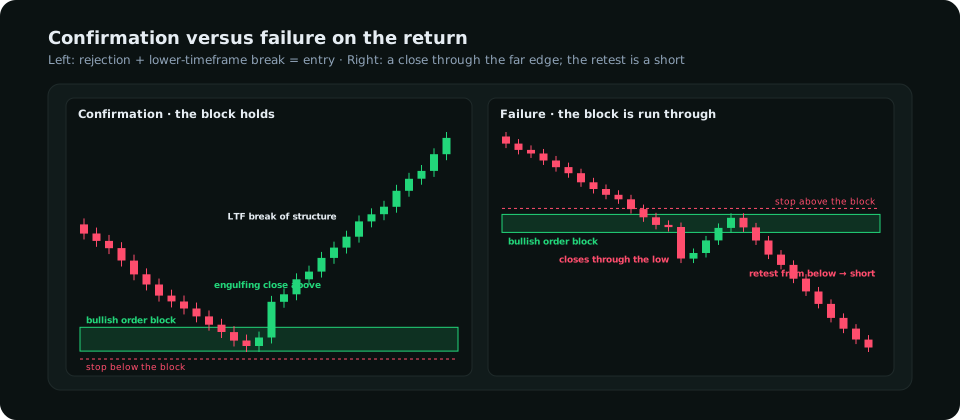
Price returning to the block is not the entry; the reaction is. The sequence to wait for, on a timeframe one or two steps below the block's:
- Price enters the zone, ideally the lower half of a bullish block (the deeper fill is the better fill).
- A rejection candle: a wick into or through the zone with a close back inside or above it.
- A lower-timeframe break of structure in the block's direction: the fifteen-minute chart takes out its last lower high.
- Entry on the close of the breaking candle or the retest of it. Stop beyond the block's far edge plus a small buffer. First target the nearest imbalance or swing in the direction of the move; second target the next liquidity pool.
Each step filters. Entering with a limit at the block's edge and no confirmation catches more moves but takes every failure at full size. Waiting for step three misses a few of the sharpest reversals but turns the majority of failures into no-trades. Most traders should wait.
Failure, and how to trade it
A block fails when price closes through its far edge with displacement: a bullish block is failed by a wide-bodied candle closing below its low, not by a wick. The failure is information. It means the order that created the block is gone (filled, pulled or overwhelmed) and the side that broke it is now in control. Three things follow: do not re-enter on the next touch, the block's far edge becomes the zone to short a retest from below, and the stop for that short is above the failed block, since a reclaim above it would mean the failure was itself a sweep. Failed blocks that are immediately reclaimed do happen, which is why the retest short also waits for its own confirmation. The SMC strategy guide places this sequence inside a complete plan.
Sizing inside the block
The stop is defined by the block, so the position size follows from the account risk divided by the stop distance, as in any position-size calculation. The refinement choice interacts with this: a refined fifteen-minute block with a 12-pip stop allows a larger position than the full four-hour block with a 30-pip stop, at the same account risk. A reasonable compromise is to enter half at the refined zone with the tight stop and half on the lower-timeframe confirmation with the stop at the full block's edge.
Frequently asked
What timeframe are order blocks best on?
Four-hour and daily blocks for the zone, fifteen-minute to one-hour for the confirmation. Blocks on the one-minute chart form and fail every few minutes and are not worth the spread.
How many times can an order block be used?
Once, in practice. The first return is where the remaining order is filled; a second return is usually a block that has been consumed. Treat a retested block as weaker each time.
Order block or fair value gap, which do I enter at?
If the block has an imbalance directly above it, the two overlap and the question answers itself: the deeper of the two. If they are separate, the imbalance fills more often and the block gives the better stop; the comparison article has the detail.
Everything on SMC Terminal is analysis and education, not a recommendation to buy or sell. Figures in the example are illustrative. Trading carries a substantial risk of loss. Manage your risk.