10 Forex Trading Strategies Explained With Rules and Examples
A strategy is a set of rules you can write down, test and repeat — not a mood. Here are ten forex trading strategies that traders actually run, each reduced to its setup, entry, stop, target and the condition that proves it wrong, with a worked example for each.
Search for forex trading strategies and you get lists of names: "scalping", "swing trading", "the London breakout". A name is not a strategy. A strategy is a set of rules precise enough that two people following them would take the same trade — a defined setup, an entry trigger, a stop, a target and the condition that proves the idea wrong. Anything less is a mood with a chart behind it.
This article takes ten approaches that forex traders genuinely run and writes each one as rules. The point is not that you should trade all ten. It is that once you can see the rules side by side, you can pick the one that fits your schedule and temperament, and you can test it instead of believing in it.
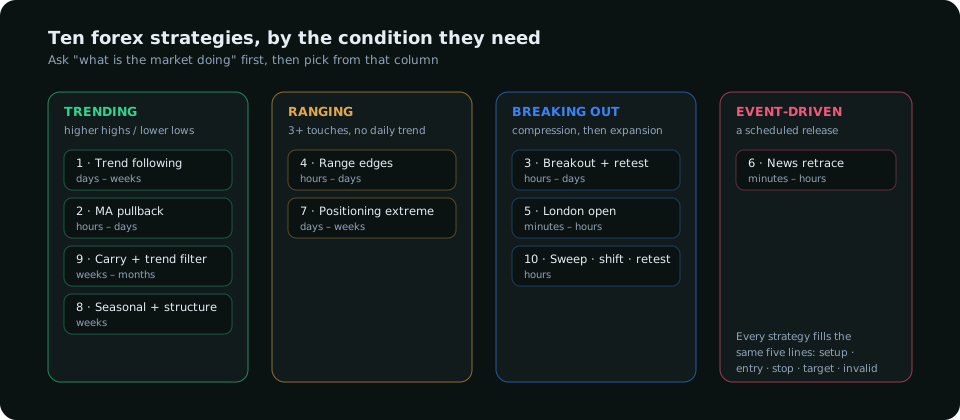
The template every strategy has to fill
Before the list, the template. Every strategy below is written against the same five lines, and if you cannot fill them for a method you are using, you are not using a method.
| Line | What it answers |
|---|---|
| Setup | What has to be true on the chart (and in the data) before you look for a trade |
| Entry | The specific event that puts you in — a close, a touch, a break |
| Stop | Where the position is closed because the idea failed, placed before entry |
| Target | Where the position is reduced or closed because the idea worked |
| Invalidation | The condition under which you stop looking for this trade at all, even before entry |
1. Trend following with structure
Setup: the daily chart prints higher highs and higher lows (or the reverse) and price is above (below) its 50-day average. Entry: on the 4-hour chart, a close back in the trend direction after a pullback that holds above the last higher low. Stop: beyond that higher low. Target: the previous swing high, then trail the stop under each new higher low. Invalidation: a daily close below the last higher low — the structure is broken, stop looking for longs.
Example: GBP/USD trending up on the daily with a higher low at 1.2850. On H4 price pulls back to 1.2880, prints a bullish close; buy 1.2895, stop 1.2835, target the prior high at 1.3010. Reward to risk 1.9 : 1.
2. Pullback to a moving average
The simplest systematic version of the above. Setup: the 20-period EMA is above the 50 on the hourly chart and both are rising. Entry: price touches the 20 EMA and the next candle closes above its open. Stop: below the 50 EMA or the last swing low, whichever is nearer. Target: 2 × the stop distance. Invalidation: the 20 crosses below the 50. The weakness: in a range the averages flatten and the touches become noise, so the setup line ("both rising") is doing all the work — do not skip it.
3. Breakout with a retest
Setup: a level tested at least twice (a range high, a prior week's high). Entry: not on the break — on the retest of the broken level from the other side that holds, confirmed by a close back in the break direction. Stop: back inside the old range. Target: the height of the range projected from the break. Invalidation: a close back inside the range before the retest completes (a failed break, which is its own setup in the other direction). Retest entries miss the breaks that never pull back; they also miss most of the false ones, which is the better trade-off.
4. Range trading from the edges
Setup: at least three touches of a high and a low with no higher-timeframe trend behind the pair (check the daily). Entry: a rejection candle at the edge — a long wick into the level and a close back inside. Stop: beyond the wick. Target: the midpoint first, the far edge second. Invalidation: a close beyond the edge on rising volume, or the daily trend turning. The premium-and-discount rule is the same idea with a cleaner vocabulary: buy only in the lower half of the range, sell only in the upper half.
5. Session-based: the London open
Setup: the Asian session has formed a range of normal size (less than half the daily ATR). Entry: in the first two hours of London, a sweep of one side of that range followed by a close back inside and then a break of the opposite side. Stop: beyond the sweep. Target: one daily ATR from the Asia midpoint. Invalidation: no sweep by 05:00 New York time — the setup is gone for the day. The full preparation routine is in the London session guide.
6. News trading — the retrace, not the spike
Trading the number itself is a race against machines. The tradable part is what happens after. Setup: a scheduled high-impact release for one of the pair's currencies. Entry: none for the first fifteen minutes. Then, if the spike has left a clean zone (the last opposing candle before the move), wait for the retrace into it and a rejection. Stop: beyond the zone. Target: the spike extreme. Invalidation: price closes through the zone — the market disagrees with the first reaction, stand aside. Spreads widen into releases; size the stop for the widened spread, not the quoted one.
7. Positioning-led swing trades
This is where data enters. Setup: the CFTC's Commitments of Traders report shows large speculators at an extreme — a net position in the top or bottom tenth of its three-year range — and the extreme has started to unwind week over week. Entry: on the daily chart, a structure shift against the crowd (a break of the last swing in the opposite direction). Stop: beyond the recent extreme. Target: the midpoint of the last major range. Invalidation: positioning makes a new extreme — the crowd is still being paid, do not fight it. How to read the report is in COT Report Explained.
8. Seasonal tendency with confirmation
Setup: a window in which the pair has moved the same direction in at least seven of the last ten years, by a meaningful amount. Entry: only when the daily structure agrees — the seasonal map says "up", the chart prints a higher low. Stop: structural, under that low. Target: the average seasonal move. Invalidation: the window closes, or structure breaks the other way. Seasonality alone is a coin with a slight weight; it is not a signal, which is exactly why the confirmation line exists.
9. Carry with a trend filter
Setup: a positive interest-rate differential in your favour (long the higher-yielding currency) and the pair in a daily uptrend. Entry: any pullback to the 50-day average that holds. Stop: a weekly close below the 50-day. Target: none — the trade is held while both conditions remain. Invalidation: the differential narrows (a central bank turns) or risk sentiment breaks (carry unwinds fast and together). Carry is not free yield; it is paid for taking the risk of a sudden reversal, and the trend filter is what keeps you out when that reversal starts.
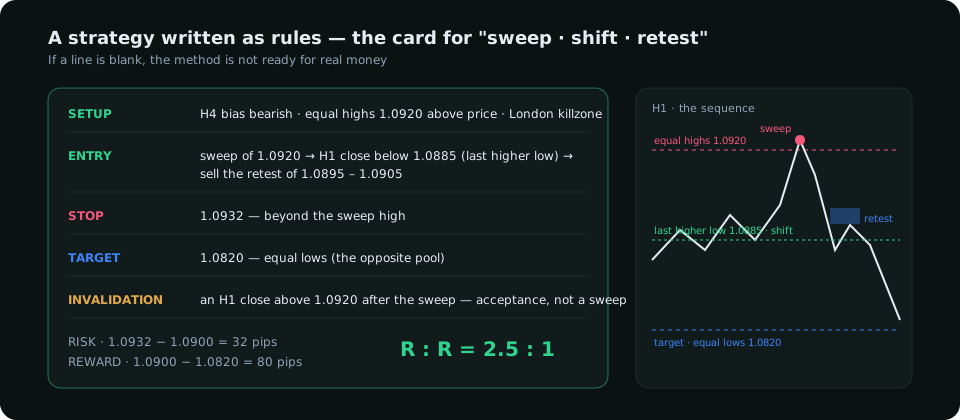
10. Smart Money Concepts: sweep, shift, retest
Setup: a higher-timeframe bias (from structure, positioning or both) and an obvious pool of liquidity against it — equal highs above price for a short. Entry: price sweeps the pool, then prints a shift in structure on the hourly chart (a close below the last higher low), then retests the zone that caused the shift. Stop: beyond the sweep. Target: the opposite pool of liquidity. Invalidation: the sweep is followed by acceptance above the highs, not a shift. The complete method, with the market-structure vocabulary, is in the SMC practical guide.
How to choose one
- Time available. Strategies 5, 6 and 10 need you at the screen during specific hours. Strategies 1, 7, 8 and 9 can be managed once a day.
- Temperament. Breakout and news methods lose often and win big; range and carry methods win often and lose big. Know which losing pattern you can actually sit through.
- Data access. Strategies 7 and 8 need positioning and seasonal data that a plain charting package does not show. That is the gap research terminals exist to fill.
Whichever you pick, run it on at least fifty trades with the rules unchanged before you judge it. The strategies that work are rarely the cleverest ones. They are the ones whose rules the trader was willing to follow on a losing day.
Everything on SMC Terminal is analysis and education, not a recommendation to buy or sell. The examples use illustrative prices. Trading carries a substantial risk of loss. Manage your risk.